How to Use Handheld Pool Vacuum
Using a handheld pool vacuum is an effective way to keep your swimming pool clean. If you are looking for an easy and efficient way to maintain the condition of your pool, a handheld pool vacuum can be a great solution. A handheld vacuum cleaner allows you to quickly and thoroughly remove dirt, debris and other contaminants from the bottom of the swimming pool without having to use traditional methods such as skimming or brushing.
It is also much easier than using a large, bulky robotic vacuum cleaner which can require more time and effort to operate properly. With the right equipment, knowledge, and techniques you can easily use a handheld pool vacuum with minimal effort in order to ensure that your swimming area is always in top shape.
- Assemble the Vacuum: Unpack the handheld pool vacuum and assemble it, following the instructions in the manual
- Connect a garden hose to one end of the vacuum and secure it with clamps or other connectors that come with your model
- Place Vacuum into Pool: Submerge one end of the pool vacuum into your swimming pool, then connect a telescoping pole to its handle for better maneuverability as you clean up debris from around your pool or on its floor or walls
- Turn on Water Supply: Turn on water supply that is connected to garden hose so that it flows through handheld vacuums body and out again, creating suction force which will help lift dirt particles off surfaces like walls and floors of pools
- Move Vacuum Around Pool Surface: Slowly move handheld vacuums head across surface of swimming pools while keeping constant pressure against any areas where there may be an accumulation of dirt such as corners or steps leading into deeper parts of pools; this will help ensure thorough cleaning throughout entire area being cleaned up by device’s suction power alone.
- Empty Out Debris Collection Container : Once finished cleaning up area in question, turn off water supply at source before disconnecting telescoping poles used during vacuuming process from their handles–then empty out collection container located near bottom portion (or side) equipment itself onto ground outside for easy disposal afterwards!
How To Use Your 4855 Handheld Pool & Spa Vacuum By GAME
How Do You Vacuum a Pool for Beginners?
If you are new to owning a pool, the process of vacuuming may seem intimidating. However, it is an essential part of keeping your pool clean and sparkling. Vacuuming helps remove dirt, debris, leaves and other contaminants from the bottom of your pool so that it can be enjoyed for years to come.
Here is a step by step guide on how to vacuum a pool for beginners: 1. Gather Your Supplies – Before you start vacuuming your pool you will need some basic supplies such as a vacuum hose, skimmer basket or net, telescopic pole and vacuum head attachment with brush bristles (if applicable). You will also need access to water in order to fill up the skimmer basket or net while cleaning out debris from the bottom of your pool.
2. Attach Hose To Skimmer Basket – Once all supplies have been gathered attach one end of the hose securely into the skimmer basket opening located at one side of your swimming pool wall where there should be a dedicated suction port available for this purpose; if not then use any suitable connection point near by where hosing can be attached without leaking air into the system when operating later on during vacuuming stage.
3. Connect The Other End Of The Hose To Vacuum Head – Connecting other end of hose onto vacuum head which should fit snugly onto its connector before being locked securely in place using provided screws/bolts or clip-lock mechanism depending upon model type being used; ensure that no leakage occurs between two components otherwise suction power won’t be sufficient enough during operation phase later down line after starting engine unit itself.
4. Start The Pump And Begin Vacuuming – Now turn on pump motor which is typically situated outside/nearby swimming area itself and begin slowly moving around perimeter whilst applying medium pressure onto surface below with help from telescopic pole accessory included in set so as not miss out any areas unseen due its depth underwater level; keep track progress made using timer clock feature built into device beforehand make sure taking necessary breaks every 10-15 minutes depending upon size/state condition found within.
How Do You Use a Manual above Ground Pool Vacuum?
If you’ve recently purchased an above ground pool, one of the essential pieces of equipment you will need is a manual vacuum. Vacuuming your above ground pool is essential for keeping it clean and free from debris. It’s not a difficult process but there are some important steps to follow in order to ensure that your pool remains safe and healthy for swimming.
Before getting started, make sure to check the pH levels of your water as well as any other necessary chemical balances. If they are off balance, adjust them accordingly before vacuuming. Once everything checks out okay, it’s time to start vacuuming!
The first step is attaching the vacuum head to the telescopic pole or handle that came with the vacuum set. Make sure all connectors are secure before proceeding further. Next attach the hose provided with the vacuum kit (if supplied) or use a regular garden hose if needed).
To do this carefully feed one end of the hose into a skimmer basket attached near where you plan on cleaning then connect up at least two sections of hosing so that when complete should be long enough reach from skimmer basket area across length of pool and back again if need be! Now place one end section into either side venturi fittings (found on most manual vacuums) which draw air through creating suction power strong enough move debris off floor & walls . Finally turn valve located underneath main body which controls direction flow allowing dirt/debris collected by moving along bottom surface being cleaned ending up inside skimmer basket ready disposal once job done.
After turning valve allow few minutes suction build-up then begin pushing forward gently while pulling back slightly each stroke – remember always keep full contact between bottom surface & cleaner head else risk losing prime thus having no suction what so ever. As progress around perimeter remember ensure all areas have been covered – paying special attention areas likely containing large amounts silt such as corners where detritus can easily accumulate over time leading potential cloudy waters later down line … also try occasionally reverse direction travel switching sides every now again help loosen stubborn patches sediment too. Once finished simply disconnect hoses turn off valves empty contents out skimmer baskets dispose properly away from sources contamination rinse thoroughly both under running tap leave dry until next session .
How Do You Use a Manual Pool Vacuum With a Garden Hose?
If you’re looking for an easy and effective way to clean your pool, a manual pool vacuum with a garden hose is the perfect solution. Not only does it require minimal effort on your part, but it also helps keep your swimming area free from debris and contaminants. So if you’re ready to get started with vacuuming your pool the right way, here are some instructions that will help make the process easier.
First things first: you’ll need to gather all of the necessary tools before getting started. This includes a manual vacuum head, telescoping pole (if needed), hoses or tubes (for connecting everything together), skimmer baskets (to catch any debris) and finally – a garden hose. Once all of these items are gathered up and in place by the side of your pool, then you can begin setting up your manual vacuum system.
To start, attach one end of the garden hose to a water source like an outdoor faucet or spigot. Connecting this end securely is important because otherwise water won’t be able to flow through properly which could cause clogging issues further down the line. After securing this connection point tightly move onto attaching other end of hose into suction opening found at bottom portion of manual vacuum head unit itself – making sure that its firmly connected as well so there aren’t any pesky leaks or air bubbles when vacuuming begins later on.
Once everything is attached correctly it’s time for testing out how well setup works before actually starting use process – turn on faucet/spigot slowly until small stream appears coming out backside where tube connects into machine itself; adjust angle accordingly if needed while doing so too ensure best performance results possible once vacuuming commences shortly after now. Next step involves placing telescoping pole with attached skimmer basket inside body water near surface level area; position manually operated switch located handle top portion forward direction which should activate suction power based off current pressure settings established earlier on during setup procedure previously described above & begin moving around submerged areas being careful not avoid pulling anything loose from bottom flooring surfaces too much force applied action since such actions could cause damage sensitive components within device itself such as motor seals etc…
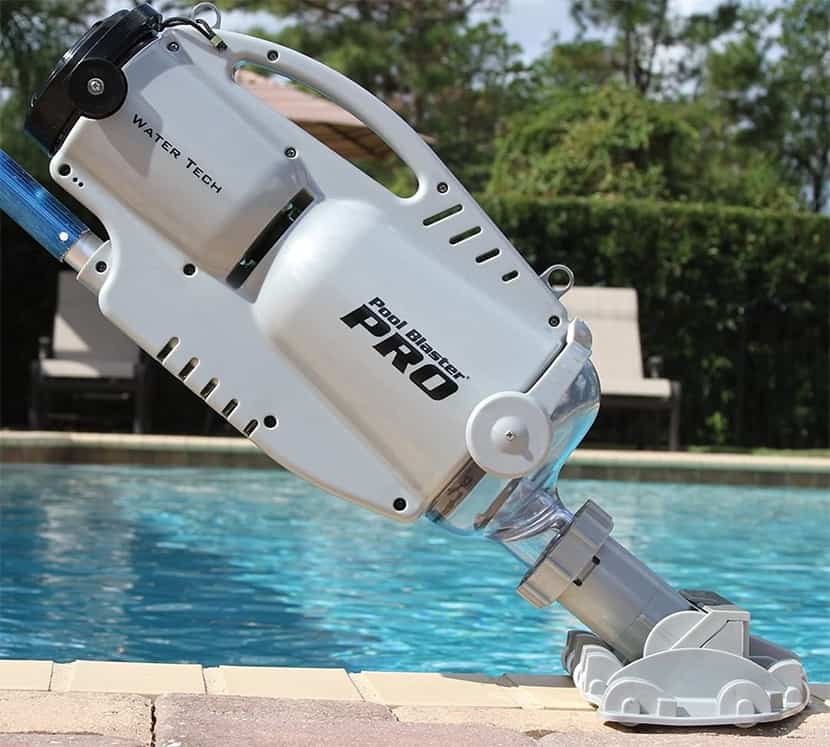
How Does a Small Pool Vacuum Work?
It’s the middle of summer and your pool is looking a bit murky. You know you need to vacuum it, but your large inground pool requires an expensive industrial-grade vacuum cleaner that you don’t have access to. Have no fear.
A small pool vacuum can be just as effective at cleaning your swimming pool without breaking the bank. Small pools vacuums work by using suction force generated by a motorized pump or turbine system to draw debris into a filter bag or container attached to the head of the machine. The motor powers an impeller which sucks water in from one side and pushes it out through another port on the other side, creating suction along with it.
As this happens, dirt and debris are sucked into the filter bag where they remain until emptied after each use. The process is quite simple and straightforward – all you need to do is attach one end of your hose (usually fitted with a specialized head) securely onto either the skimmer box or designated outlet pipe within your swimming pool, while connecting its other end firmly onto any standard garden hose spigot outside. Once everything has been connected properly, turn on both faucets and switch on your small pool vacuum’s power source; you should immediately see bubbles being created as air enters through one end of the tube while water comes out from another exit point near its handle/control center.
This will allow for maximum suction power so that dirt particles can be effectively removed from walls, floors and corners alike – leaving behind nothing more than shimmering cleanliness in their wake! An important thing to keep in mind when using these types of vacuums is that they must only be used in shallow depth bodies of water – typically anything over 3 feet deep could cause serious damage due to high pressure levels being exerted onto sensitive parts such as seals/gaskets inside their motors’ housing unit(s). Additionally, if you happen to own a slightly larger model (i.e.: above ground), make sure not submerge too far down below surface level as most models tend not feature waterproof components capable enough withstand deeper depths without malfunctioning prematurely!
In conclusion, Small Pool Vacuums are great tools for quickly removing even stubborn dirt deposits found within smaller private pools without having invest heavily into expensive commercial grade alternatives – making them perfect choice those who want get job done right first time round.

Credit: www.amazon.com
How to Use Pool Vacuum With Garden Hose
If you’re looking to keep your swimming pool clean and clear, a pool vacuum is an essential tool. Pool vacuums are great for removing debris from the bottom of your pool and keeping it free of dirt and grime. But in order to get the most out of your pool vacuum, you need to know how to use it with a garden hose.
Pool vacuums have two main parts: the head unit and the suction power source. The head unit contains brushes or bristles that help remove dirt from the bottom of the pool while also helping stir up any debris particles suspended in water column. The suction power source is usually either a skimmer basket attached directly to the side wall or else an external pump connected via hoses or pipes.
If you’re using a garden hose as your suction power source, then there are three basic steps involved: connecting it up, priming it, and running it through its cycle.
The first step is connecting up your garden hose properly so that both ends are securely attached – one end should attach directly into an outlet on the side wall and another end should be hooked up either directly into an external pump or into some sort of appropriate adapter which will allow for connection between different types of hoses (e.g., plastic-to-metal). Once everything is connected correctly, turn on both valves (the one at the wall outlet as well as any additional valve installed near/atop an external pump) so that water can flow freely from one end to other & create sufficient amounts pressure needed for efficient operation .
The second step involves priming – this means filling whatever chamber exists within either skimmer basket or external pump with enough water such that all air has been displaced by liquid before actual cycling begins; failure do this will cause problems later down line due possible backflow blockages which may occur if too much air gets trapped inside system during cleaning process itself! This can easily done by submerging entire setup under surface level & allowing gravity work its magic until bubbles come out other end indicating successful displacement occurred already 🙂 Afterward simply open valve(s) again move onto final stage…
Finally we reach ‘running cycle’ portion our endeavor – just turn switch located somewhere along length device itself start sucking away dirt debris found lurking about depths aquatic realm!
Conclusion
Having a sparkling clean pool is everyone’s dream! But keeping it that way requires regular maintenance. A handheld pool vacuum can help you keep your pool spotless without having to spend hours with the traditional manual vacuum.
Here are the steps on how to use one: First, make sure your filter pump and skimmer baskets are clear of debris before using a handheld vacuums. This will ensure that there’s enough suction power for cleaning the bottom of the pool.
Then, attach the hose to your handheld vacuum and connect it to your filtration system or pressure/vacuum side port. Make sure all connections are tight so that no air escapes during operation. When everything is set up properly, turn on both skimmer valves and let them run for about two minutes before turning on the handheld vacuum cleaner itself.
You may want to adjust the flow rate depending on how powerful you need it to be – in general, more water means more suction power but this also depends on other factors such as size of hose used. Finally, start moving around slowly while holding onto handlebars so that you can cover larger area efficiently without leaving any dirt behind.