How to Remove Front Wheel Shark Robot Vacuum?
If your Shark robot vacuum has a front wheel that needs to be removed, follow these steps. First, unplug the vacuum and lay it down on its back. Next, locate the two screws that hold the wheel in place (one on each side of the wheel).
Use a Phillips head screwdriver to remove the screws. Be careful not to lose them! With the screws removed, you should be able to pull the wheel off easily.
If there is any resistance, make sure that both screws are completely removed before trying again.
- Unplug the vacuum from the power outlet
- Turn the vacuum over so that you can access the bottom of the unit
- Locate the two screws on either side of the front wheel assembly
- Use a Phillips head screwdriver to remove the screws
- Carefully pull the front wheel assembly away from the body of the vacuum
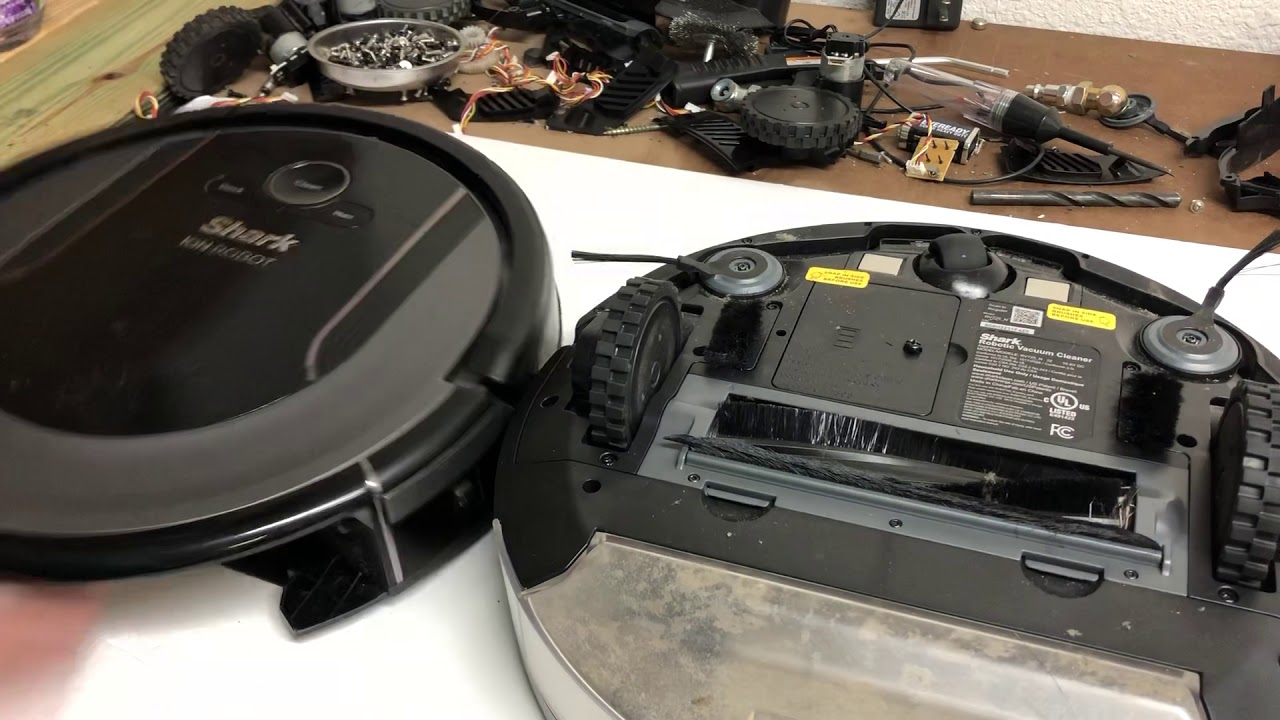
- Disconnect the wiring harness from the motorized brushroll by pressing down on the tab and pulling it out of place
- 7 7Remove any debris that may be caught in or around the front wheel assembly before reattaching it to your Shark vacuum cleaner

Credit: www.amazon.com
How Do You Take the Front Wheel off a Shark Robot?
There are a few things you need to do in order to take the front wheel off of a shark robot. The first thing you need to do is remove the battery. Next, you’ll need to unscrew the two screws that hold the wheel on.
Finally, you can simply pull the wheel off.
How Do You Remove the Front Caster Wheel on Shark Iq Robot?
If you need to remove the front caster wheel on your Shark IQ robot, follow these steps:
1. Use a Phillips head screwdriver to remove the two screws that secure the caster wheel to the base of the robot.
2. Carefully pull the caster wheel away from the base.
It may be necessary to wiggle it a bit to get it free.
3. That’s it! You’ve now removed the front caster wheel from your Shark IQ robot.
How Do You Take the Front Wheel off a Robot Vacuum?
If you need to take the front wheel off of your robot vacuum, there are a few things that you will need to do. First, you will need to locate the screws that hold the wheel in place. Next, using a Phillips head screwdriver, unscrew the screws and remove the wheel.
Finally, reattach the screw to secure the wheel in place.
How Do You Take the Wheels off a Shark Rocket?
Assuming you would like tips on how to remove the wheels from a Shark Rocket vacuum:
1. Use a Phillips head screwdriver to remove the screws on the bottom of the vacuum where the wheels are attached. There should be two screws.
2. Once the screws are removed, pull the wheel off of the axle. The other wheel can now be pulled off as well.
How replace front wheel on Shark Ion Robot Vacuum Cleaners
Shark Iq Robot Front Wheel
If you’re like most people, the thought of a shark swimming around in your house is enough to send you into a panic. But what if we told you that there’s now a robot that can do the job for you? Introducing Shark Iq Robot Front Wheel, the world’s first robotic vacuum cleaner designed specifically for cleaning up after your pets.
With its powerful suction and advanced navigation system, Shark Iq Robot Front Wheel is perfect for picking up pet hair, dirt, and debris from all kinds of surfaces. And because it’s self-charging, you never have to worry about it running out of juice in the middle of a clean. What’s more, Shark Iq Robot Front Wheel comes with an array of handy features including a detachable dustbin, LED headlights, and boundary strips that help it avoid furniture and other obstacles.
So if you’re looking for a hassle-free way to keep your home clean and tidy, this is definitely the vacuum for you.
How to Take Wheels off Shark Vacuum
Assuming you would like a step-by-step guide on how to take the wheels off of a Shark vacuum:
1. Unplug your Shark vacuum from the outlet.
2. Locate the screws that hold the wheels in place.
There are typically two screws per wheel.
3. Use a screwdriver to remove the screws, and then gently pull the wheel off of the vacuum cleaner.
4. Repeat this process for each wheel until all four have been removed.
Shark Iq Drive Wheel Error
If you’re the owner of a Shark IQ Robot vacuum, you may have recently come across an error called the “IQ Drive Wheel Error.” This error is caused by a problem with the drive wheel on the vacuum, and it can be quite frustrating. Thankfully, there are some things you can do to fix this problem.
First, make sure that there is nothing blocking the drive wheel. If there is something blocking it, such as a piece of dirt or debris, simply remove it and try again.
If the drive wheel still isn’t working properly, it’s likely that there is an issue with the sensors.
To fix this, you’ll need to perform a factory reset on your vacuum. To do this, press and hold the power button for 10 seconds. Once the reset is complete, try using your vacuum again.
If you’re still having trouble with your drive wheel after trying these steps, please contact Shark customer support for further assistance.
Shark Vacuum Front Wheels
If your Shark vacuum isn’t steering correctly, it may be due to an issue with the front wheels. In this blog post, we’ll show you how to check and clean the front wheels of your Shark vacuum, as well as some common causes of wheel issues.
The first thing to do if you think there’s an issue with your Shark vacuum’s front wheels is to check for any obstructions.
Debris can sometimes build up on the wheels and cause them to not rotate properly. If you see any dirt or debris, simply remove it with a cloth or brush.
Another common cause of problems with front wheels is that they may become loose over time.
To fix this, simply tighten the screws that hold the wheels in place. You may need a screwdriver to do this.
If neither of these solutions solves the problem, then there may be an issue with the bearings in the wheels themselves.
The best way to fix this is to take your vacuum to a qualified repair shop where they can replace the bearings for you.
Shark Robot Front Wheel Error
If you’re the proud owner of a Shark Robot vacuum, you may have noticed that your front wheel isn’t working correctly. This is a common error that can be easily fixed.
The first thing you’ll want to do is check the battery.
If the battery is dead, it will need to be replaced. Shark Robot offers a replacement battery for $49.99 on their website.
Once you’ve checked the battery, take a look at the wheel itself.
Make sure that there’s nothing blocking it from spinning freely. If there is, simply remove the obstruction and try again.
If neither of those solutions work, then there may be an issue with the motor itself.
Fortunately, Shark Robot offers a replacement motor for $39.99 on their website as well.
Shark Robot Vacuum Repair
If your Shark robot vacuum isn’t working properly, there are a few things you can do to try and fix the problem. First, check the power cord to make sure it’s plugged in correctly. Next, check the brushroll to see if it’s obstructed.
If neither of these is the problem, you may need to replace the battery.
To replace the battery, first remove the screw from the back of the vacuum. Then, pull out the old battery and insert the new one.
Finally, screw the back panel back on and test out your vacuum to see if it’s working properly now.
Conclusion
If your Shark robot vacuum has a front wheel, you may notice that it doesn’t move as smoothly as it should. The front wheel may also be making noise or causing the vacuum to vibrate. In this case, you’ll need to remove the front wheel and clean it.
First, unplug the vacuum and turn it over so that you can access the underside. Locate the two screws that hold the front wheel in place and remove them with a Phillips head screwdriver. Once the screws are removed, you should be able to pull the front wheel off of the vacuum.
Clean any dirt or debris from the inside of the wheel housing and from the surface of the wheels themselves. You may also want to use a cotton swab to clean out any dirt that’s accumulated in the axle hole. Once everything is clean, reattach the front wheel and screw it back into place.