How To Put Together A Mop Bucket?
When it comes to cleaning, one of the most important tools you can have is a mop bucket. Mop buckets make it easy to clean floors without having to lug around a big bucket of water. They also make it easy to wring out your mop, so you don’t have to worry about dripping water all over the place.
If you’re not sure how to put together a mop bucket, don’t worry—it’s easy! Just follow these simple steps.
- Gather the supplies you will need: a mop, a bucket, and a wringer
- Place the mop inside the bucket
- Add water to the bucket, enough to soak the mop
- Place the wringer on top of the bucket and screw it in place
- Squeeze the mop to remove excess water and then place it in the wringer
- Crank the handle on the wringer to wring out the mop
- Hang the mop up to dry
Credit: www.webstaurantstore.com
How do you set up a mop bucket?
Assuming you would like tips on how to set up and use a mop bucket:
First, you need to gather the necessary materials which include a mop, a mop bucket, and water. You will also need a way to heat the water if you are using cold water from the tap.
Next, you need to fill the mop bucket with the desired amount of water. If you are using hot water, be careful not to scald yourself.
Once the bucket is full, you can dip the mop into the water and start cleaning your floor.
Be sure to wring out the mop after each dip into the bucket to avoid putting too much water on your floor.
When you are finished mopping, empty the contents of the bucket into your sink and rinse out the bucket. Be sure to also rinse out the mop so that it does not mildew.
You can then store the bucket and mop until they are needed again.
How do you put mop bucket wheels on?
Assuming you are referring to a standard round mop bucket, the process is relatively straightforward. For buckets with two handles, there will generally be two sets of wheels – one near the top and bottom of the bucket. To attach the wheels, simply line up the holes on the wheels with the corresponding holes on the bucket and insert the provided screws.
If your bucket has a single handle, there will likely only be one set of wheels (near the bottom of the bucket). The process for attaching these wheels is the same as for the two-handled buckets.
With the wheels in place, your mop bucket will be much easier to move around, whether you’re mopping the floor or transporting cleaning supplies from one room to another.
Just be sure to empty the bucket regularly to avoid damaging the wheels (and your floor).
How do you fix a mop bucket wringer?
If your mop bucket wringer is not working properly, there are a few things you can do to fix it. First, check to see if the wringer is properly assembled. If it is not, follow the instructions in the manual to properly assemble it.
Next, check to see if the wringer is properly attached to the bucket. If it is not, follow the instructions in the manual to properly attach it. Finally, check to see if the bucket is properly filled with water.
If it is not, follow the instructions in the manual to properly fill it.
How do you put together a Ecolab mop bucket?
Assuming you would like instructions on how to properly set up an Ecolab mop bucket:
Ecolab mop buckets are designed to make mopping quick and easy while still providing a deep clean. The buckets have two compartments – one for clean water and one for dirty water.
To set up your bucket, simply fill the clean water compartment with hot water and a small amount of Ecolab floor cleaner. Then, dip your mop into the clean water and mop the floor. When you’re finished, dip the mop into the dirty water compartment to rinse it off.
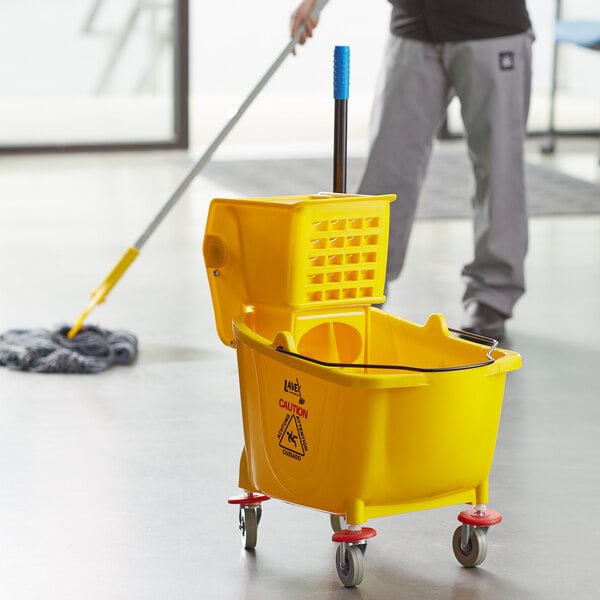
Mop Bucket with Wringer
Ecolab mop bucket instructions
Properly cleaning your floors is important to maintaining a healthy and safe environment. Ecolab has provided clear instructions on how to use their mop bucket properly. Read on to learn more.
To begin, fill the bucket with warm water and the recommended amount of Ecolab floor cleaner. Next, dip the mop head into the solution and squeeze out any excess water. Be sure to move the mop back and forth to evenly distribute the solution over the floor.
When you are finished, rinse the mop head in clean water and wring it out thoroughly. Return the mop and bucket to their original location.
By following these simple instructions, you can be sure that your floors are being properly cleaned and disinfected.
How to fix mop bucket wringer
If your mop bucket wringer isn’t working properly, there are a few things you can do to try to fix it. First, make sure that the bucket and wringer are both clean. If they’re dirty, they may not be able to grip the mop head properly or may not be able to spin properly.
Next, check to see if the wringer is properly assembled. If it’s not, it may not be able to grip the mop head properly or may not be able to spin properly.
Finally, if the wringer still isn’t working properly, you may need to replace it.
Mop bucket wringers don’t typically last forever and eventually they will need to be replaced.
If you follow these steps and your mop bucket wringer still isn’t working properly, you may need to contact a professional for help.
Ecolab dual cavity mop bucket
If you’re looking for an efficient and easy-to-use mop bucket, the Ecolab dual cavity mop bucket is a great option. This mop bucket has two compartments – one for clean water and one for dirty water – which helps to keep your workspace clean and organized. The Ecolab dual cavity mop bucket also features a built-in wringer, so you can easily wring out your mop without getting your hands dirty.
Plus, the Ecolab dual cavity mop bucket is made from durable, high-quality materials, so it’s built to last.
Industrial mop bucket
An industrial mop bucket is a large, usually round container with a handle and a spout, used for holding and transporting large amounts of liquid. They are often made of plastic or metal, and have a capacity of 5 gallons or more. Industrial mop buckets are typically used in commercial or industrial settings, such as hospitals, schools, office buildings, and factories.
They are also commonly used by janitorial and cleaning services.
Conclusion
When it comes to mopping, having a quality mop bucket is essential to getting the job done right. But with so many different buckets on the market, it can be hard to know which one is right for you. In this post, we’ll walk you through everything you need to know about mop buckets, from the different types available to how to put one together.
There are two main types of mop buckets: plastic and metal. Plastic buckets are typically less expensive and lighter in weight, while metal buckets are more durable and often have built-in wringers. Whichever type you choose, be sure to look for a bucket with a sturdy handle that won’t break when full of water.
As for putting the bucket together, it’s really quite simple. Start by attaching the handle to the base, then add the mop head. If you’re using a plastic bucket, you may need to screw the handle in place.
Finally, fill the bucket with water and you’re ready to start mopping.