How To Assemble Spin Mop Bucket?
A spin mop bucket is an easy way to clean your floors without having to get down on your hands and knees. The bucket has a built-in wringer that spins the mop head, removing dirt and water from the mop head. Assembling a spin mop bucket is a simple process that can be done in a few minutes.
Place the spin mop bucket on a flat surface
Insert the handle into the hole at the top of the bucket
Push the handle down until it clicks into place
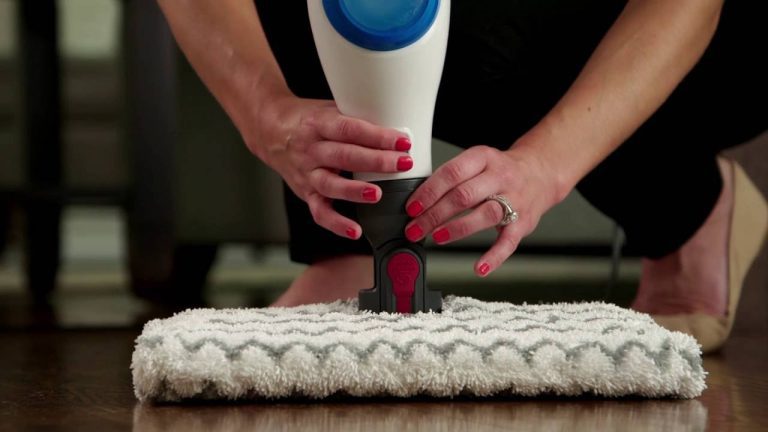
Place the spin mop head onto the floor
Insert the handle of the spin mop into the hole at the top of the spin mop head
Push the handle down until it clicks into place
Fill the bucket with water
Place the spin mop head onto the floor
Insert the handle of the spin mop into the hole at the top of the spin mop head
Push the handle down until it clicks into place

Credit: www.amazon.com
How do I put my spin mop back together?
If you’re like most people, you probably don’t think about your spin mop until it’s time to use it. And when you do use it, you probably don’t think about how it works or how it’s put together. But if you’re having trouble putting your spin mop back together, don’t worry – we’re here to help!
The first thing you need to do is find the right size bucket for your spin mop. You can usually find this information on the bottom of the bucket. Once you have the right size bucket, you’ll need to put the spin mop pole into the bucket.
The pole should fit snugly into the bucket, so that it doesn’t fall out when you’re using it.
Next, you’ll need to attach the mop head to the pole. There should be a clip or a latch that you can use to secure the mop head to the pole.
Once the mop head is attached, you can dip it into the bucket of water and start mopping!
If you’re still having trouble, there are plenty of instructional videos online that can show you how to put your spin mop back together. And if all else fails, you can always contact the manufacturer for help.
How do you assemble a rotating mop?
Assuming you would like a step-by-step guide on how to assemble a rotating mop:
1. Unscrew the mop handle from the base.
2. Remove the old mop head and throw it away.
3. Wet the new mop head and wring it out so that it is damp but not dripping.
4. Place the new mop head onto the base, aligning the Velcro strips.
5. Screw the handle back onto the base.
6. Push down on the handle to engage the mop head.
7. Pull the handle back and forth to rotate the mop head.
How do you assemble a floor mop?
Assuming you would like a blog post discussing how to assemble a typical floor mop:
Most floor mops come in two pieces: the mop head and the handle. To assemble the mop, simply screw the handle into the threaded hole in the mop head.
Some mop heads have a swivel joint that allows the head to rotate; if your mop head has this feature, be sure to line up the joint before screwing in the handle.
That’s all there is to it! Assembling a floor mop is quick and easy, and only takes a few seconds.
Once you have your mop assembled, you’re ready to start cleaning your floors!
How do you use a spin mop with a bucket?
If you’ve never used a spin mop before, the process may seem a little daunting. But don’t worry – it’s actually quite simple! Here’s a step-by-step guide on how to use a spin mop with a bucket:
1. Fill the bucket with warm water. Add a little bit of mild detergent if desired.
2. Dip the mop head into the water, making sure to saturate it completely.
3. Place the mop head onto the spinning mechanism on the top of the bucket.
4. Push down on the handle to start the spinning process. The mop head will rotate rapidly, wringing out the water.
5. Lift the mop head off of the spinning mechanism and proceed to mop your floors as usual.
6. When you’re finished, return the mop head to the bucket and repeat steps 3-5 to wring it out completely.
7. Hang the mop head up to air dry, or place it in a sunny spot to speed up the process.
And that’s all there is to it! Using a spin mop with a bucket is a quick and easy way to clean your floors, and it’ll leave them streak-free and sparkling.
Autolizer 360° Spinning Mop Unboxing and Install Instruction
Clorox spin dry mop instructions
Assuming you would like a blog post about how to use a Clorox spin dry mop:
When it comes to cleaning your floors, you want a mop that will make the job as easy as possible. The Clorox Spin Dry Mop is a great choice for anyone looking for a quality mop.
Here are some instructions on how to use this mop so you can get the most out of it.
First, make sure you have the right supplies. You will need a bucket, some Clorox cleaner, and of course, the Spin Dry Mop.
Fill the bucket with hot water and add the recommended amount of Clorox cleaner.
Next, dip the mop head into the bucket and start scrubbing your floor. The great thing about the Spin Dry Mop is that it will spin the water out of the mop head as you go, so you don’t have to worry about dripping water all over the place.
Once you’ve gone over the whole floor, take the mop head off and rinse it in the sink. Then, put it back on the mop and spin it dry.
Now your floor is clean and you didn’t have to break a sweat!
The Clorox Spin Dry Mop is a great choice for anyone looking for an easy-to-use, effective mop.
Conclusion
In order to assemble a spin mop bucket, you will need the following items: a bucket, a pole, and a mop head. First, place the bucket on the floor. Next, insert the pole into the bucket.
Finally, attach the mop head to the pole.