Irobot Roomba Brush Replacement: Easy Guide to Boost Performance

Maintaining a clean home is essential. Your Roomba helps with that.
But what happens when its brush wears out? Keeping your iRobot Roomba in top shape ensures efficient cleaning. One key part to check is the brush. Over time, brushes collect dirt and debris, reducing their performance. Regular replacement is crucial to maintain your Roomba’s effectiveness.
In this blog, we’ll explore why brush replacement is important, how often to replace them, and a simple guide to do it yourself. This ensures your Roomba continues to clean your home efficiently. Stay tuned to learn more about keeping your Roomba at its best.
Importance Of Brush Maintenance
Maintaining the brushes on your iRobot Roomba is crucial for optimal performance. Regular brush maintenance ensures your robot vacuum cleans effectively and efficiently. It keeps your Roomba running smoothly, prolonging its lifespan. Neglecting brush care can lead to reduced cleaning power and potential damage.
Why Brushes Wear Out
Roomba brushes face constant wear due to daily use. Dust, hair, and debris build up over time. This accumulation stresses the brushes, causing them to fray or break. Regularly cleaning and replacing brushes prevents this wear, keeping your Roomba in top condition.
Impact On Cleaning Efficiency
Worn brushes diminish your Roomba’s cleaning efficiency. They fail to pick up dirt effectively. This results in less thorough cleaning, leaving dust behind. Replacing brushes ensures your Roomba cleans like new, maintaining high performance and spotless floors.
Choosing The Right Replacement Brush
Finding the ideal brush for your Irobot Roomba ensures effective cleaning. Choose a brush that fits your model perfectly. Regular replacement maintains cleaning efficiency and extends your Roomba’s lifespan.
Choosing the right replacement brush for your iRobot Roomba is crucial. It ensures optimal cleaning performance. Different models require specific brushes. Selecting the wrong one can affect cleaning efficiency. This guide helps you choose the best brush for your Roomba.
Types Of Roomba Brushes
Roomba uses various brush types for different tasks. The main brush handles dirt and debris. It’s effective on carpets and hard floors. Side brushes reach corners and edges. They sweep dust into the vacuum path. Some models use rubber brushes. These are ideal for pet hair and larger debris. Understanding these types helps you pick the right replacement.
Compatibility With Models
Different Roomba models need specific brushes. Not all brushes fit every model. Check your Roomba’s model number first. This ensures you buy compatible brushes. Most brushes have model compatibility listed. Make sure to double-check this information. Using the wrong brush can reduce cleaning efficiency. It may also damage your Roomba. Always verify compatibility before purchasing.
Tools Needed For Replacement
Replacing the brush on your Irobot Roomba requires a few essential tools. A screwdriver is needed to remove the screws holding the brush in place. Having a pair of gloves can help keep your hands clean during the process.
Replacing the brush on your iRobot Roomba is essential for optimal performance. It ensures the vacuum works efficiently, picking up dirt and debris. Having the right tools makes this process straightforward. Let’s explore the tools you need for a smooth replacement.
Essential Tools
A screwdriver is necessary for most Roomba models. It’s used to remove screws holding the brush in place. Keep a small Phillips-head screwdriver in your tool kit. This type fits most Roomba screws perfectly. A cleaning tool is also vital. It helps remove hair and dirt from the brush. Many Roomba models include this tool in the package. If not, it’s available separately.
Optional Accessories
Consider using a pair of gloves. They keep your hands clean during the replacement process. Some users find them helpful when dealing with dirt. A flashlight can be useful as well. It illuminates hard-to-see areas under the Roomba. This helps ensure you’ve removed all screws and debris. A small container is handy to hold screws safely. It prevents losing them during the process.
Step-by-step Replacement Process
Replacing the brushes on an iRobot Roomba improves its cleaning performance. First, turn the Roomba upside down. Then, remove the brush guard and old brushes. Insert the new brushes and secure the guard back in place. Regular maintenance keeps your Roomba efficient and effective.
Are you tired of your Roomba leaving dirt behind? A worn-out brush might be the culprit. Replacing the brush is a straightforward task that can breathe new life into your robotic cleaner. Here’s how you can do it effortlessly.
Preparing Your Roomba
Before you start, ensure your Roomba is turned off and unplugged. This prevents any accidental activation. Place your Roomba on a clean, flat surface, like a table or countertop, to have a clear view and easy access to all parts.
Gather the necessary tools. Most replacements require just a screwdriver. Having everything ready saves you time and hassle during the process. Also, make sure the new brush is compatible with your Roomba model.
Removing The Old Brush
Flip your Roomba over to access the brush compartment. You’ll find a few screws securing the brush panel. Gently unscrew them and set them aside safely.
Once the screws are removed, lift the panel to expose the brush. Carefully detach the old brush by pulling it out from its slot. Notice any accumulated debris and give the compartment a quick clean.
Installing The New Brush
Take the new brush and align it with the slot. Insert it carefully, ensuring it fits snugly into place. You should hear a small click or feel it settle into the slot.
Replace the brush panel and tighten the screws securely. Double-check everything is in place and nothing is loose. Your Roomba is now ready to tackle dirt and debris with renewed efficiency.
Doesn’t it feel rewarding to maintain your gadget independently? Just a little effort extends your Roomba’s life and boosts its performance. How often do you take the time to keep your appliances in top shape?
Cleaning The Brush Area
Replacing the brushes on your iRobot Roomba ensures efficient cleaning. Regularly check and replace them to maintain top performance. Keep your floors spotless with this simple maintenance step.
Cleaning the brush area of your iRobot Roomba is a crucial maintenance task that ensures your device performs optimally. Just like maintaining a car’s engine, keeping the brush area clean prolongs the life of your Roomba and enhances its efficiency.
You might be surprised at how much debris can accumulate, affecting performance. Imagine the satisfaction of watching your Roomba glide seamlessly over floors after a thorough cleaning. Let’s delve into the steps to keep your Roomba’s brush area spotless.
Clearing Debris
Begin by removing the brush module from your Roomba. This simple action gives you access to areas often hidden from view.
Use a small brush or an old toothbrush to dislodge debris. You’ll be amazed at how much dust can hide in corners.
A handheld vacuum can be your best friend here, sucking up loose dirt and fluff. Have you ever tried using a vacuum on a vacuum?
Inspecting For Damage
Once you’ve cleared the debris, take a closer look at the brushes themselves. Are the bristles worn out or bent?
Check the bearings and caps. A small crack can compromise the whole system. Have you ever noticed how a single damaged component can halt an entire operation?
Ensure the brushes spin freely. If they resist, it might be time for a replacement. You wouldn’t want your Roomba struggling on every pass, would you?
Cleaning and inspecting your Roomba’s brush area is not just about maintaining functionality; it’s about enhancing your home’s cleanliness. When was the last time you checked the brush area?

Credit: www.irobot.com
Testing The New Brush
Trying out the new Irobot Roomba brush replacement can enhance cleaning efficiency. The fresh brush design tackles dirt more effectively. It’s easy to install, ensuring your Roomba maintains peak performance.
Testing the new brush on your iRobot Roomba is an essential step to ensure optimal cleaning performance. A fresh brush can significantly enhance your Roomba’s ability to pick up dirt and debris. But how can you be sure that your new brush is working as it should? Let’s dive into the process of testing your new Roomba brush and making the most out of your cleaning sessions.
Running A Cleaning Cycle
Start by placing your Roomba in a room that is relatively clean but still has some visible dust or debris.
Press the “Clean” button to initiate a cleaning cycle.
Observe how the Roomba moves and whether it successfully picks up dirt. Does it leave any traces behind?
A new brush should allow your Roomba to glide smoothly and collect debris effectively.
Checking For Issues
Once the cycle is complete, inspect your Roomba for any collected dust.
Did the new brush pick up less than expected?
Look for signs of improper installation, such as a brush that is too loose or tight.
Assess the brush itself for any visible wear or damage.
A quick inspection can help you identify if something needs adjustment or replacement.
Have you ever noticed how a new appliance part sometimes doesn’t fit just right? This is your chance to make sure everything is snug and ready for action.
Testing the new brush is not just about ensuring it works. It’s about maximizing your Roomba’s cleaning potential.
By running a cleaning cycle and checking for issues, you can be confident in your Roomba’s performance.
What other steps do you think are crucial for maintaining your Roomba? Share your thoughts or tips below
Maintaining Your Roomba Brushes
Regularly replacing Roomba brushes ensures optimal cleaning performance. Fresh brushes help maintain efficiency by removing dirt effectively. Keep your Roomba running smoothly with timely brush replacements.
Maintaining your Roomba brushes is crucial for optimal performance. Clean brushes ensure your Roomba picks up dirt efficiently. They also extend the lifespan of the device. Neglecting brush maintenance can lead to reduced cleaning efficiency. It may even damage your Roomba. Regular attention to brushes keeps your Roomba in top shape.
Regular Cleaning Tips
Clean your Roomba brushes after every cleaning session. Remove any hair or debris wrapped around the brushes. Use the cleaning tool that comes with your Roomba. This tool helps remove tangled hair easily. Inspect the brushes for any lodged dirt. Wipe them with a damp cloth for thorough cleaning. Allow them to dry completely before reattaching.
Replacing Brushes On Schedule
Replace your Roomba brushes every six to twelve months. Usage frequency affects how often you should replace them. Check the brushes for signs of wear. Bent or frayed bristles are indicators. Replacing worn brushes ensures efficient cleaning. Always use genuine Roomba replacement parts for best results. Follow the manufacturer’s instructions for proper replacement.

Credit: www.walmart.com
Troubleshooting Common Problems
Replacing the brush in your iRobot Roomba can solve many cleaning issues. Regular maintenance ensures optimal performance. Always use compatible parts for best results.
When your Roomba suddenly stops working as efficiently as it used to, it can be frustrating. The problem might be as simple as a brush replacement. But what if the new brush doesn’t solve everything? Let’s dive into some common problems you might encounter and how to fix them. Addressing these issues head-on can save you time and get your Roomba back to its best performance quickly.
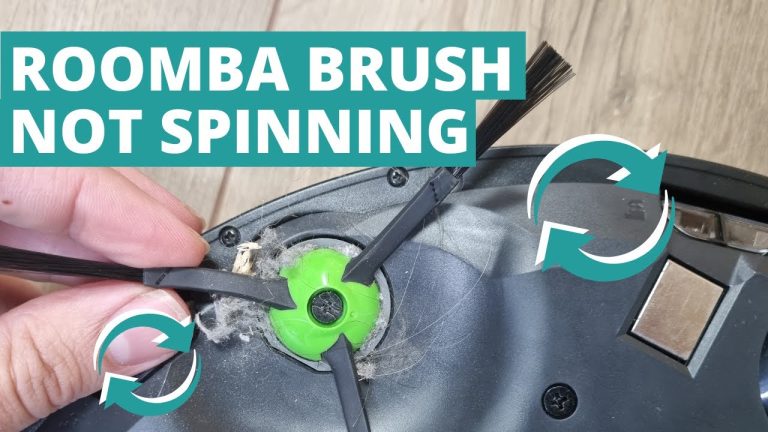
Brush Not Spinning
Is your Roomba’s brush refusing to spin? This can be a common issue that affects cleaning efficiency. First, check if the brush is clogged with hair or debris. You’d be amazed at how much can build up, even in a short time.
Remove the brush and clean it thoroughly. Inspect the brush motor, as it might need a reset or replacement. Sometimes, a quick reset is all it takes to get things moving again.
Consider whether the brush is installed correctly. It’s easy to accidentally fit it the wrong way. Double-check the alignment and ensure it clicks into place securely.
Noise Issues
Strange noises coming from your Roomba can be unsettling. A common culprit is a misaligned brush or one that’s not properly seated. Even a small misalignment can cause a racket.
Take the brush out and reattach it, ensuring it’s secure. Sometimes, tiny bits of debris get trapped, causing the noise. A good cleaning can often solve this problem.
If the noise persists, think about when it started. Was it after the brush replacement? If so, there might be a compatibility issue with the new brush. Make sure you have the correct model for your Roomba series.
Don’t ignore noises, as they can indicate bigger problems down the line. Address them early to keep your Roomba running smoothly.
In your experience, have you found other effective solutions to these issues? Share your tips and help fellow Roomba users keep their robots in top shape. Your insights might be just what someone else needs.

Credit: www.amazon.com
Conclusion
Replacing your iRobot Roomba’s brush is simple and essential. It ensures efficient cleaning. Regular maintenance extends your Roomba’s lifespan. Follow the steps mentioned for a smooth replacement process. Clean your home effectively with a well-functioning Roomba. Keep your floors spotless with minimal effort.